|
 Project Description: Popping in 2 Golden Orbs into
a BP6 mobo Project Description: Popping in 2 Golden Orbs into
a BP6 mobo
Parts Needed: 2 Golden Orb Heatsinks (www.plycon.com), 1 small metal file, 3-litre bottle of Mountain Dew, 1 tube of heatsink
compound.1 red marker, 1 roll electrical tape, 1 can of air
Project time: 2 Hours give or take a day or two
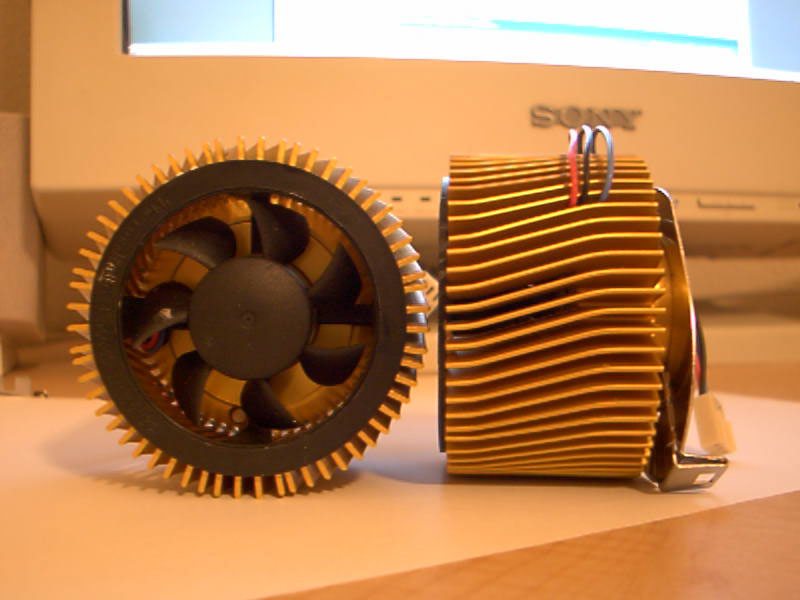
Step 1: Unwrap the golden orbs from their protective paper boxes. Take some pictures and show your freinds.
You'll be the envy of the neighborhood. 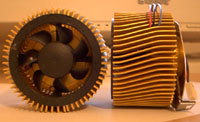
Step 1: (The real first step after playing with your orbs) Make room in your case so that you can get
your hands and arms in there. You need to be able to see what you are doing in order to take the old heatsinks
off of your BP6 mobo (slang for motherboard). Then gently pry off the old heatsinks and wipe off any unecceasy
goo that's still stuck to the CPU's. You need to make sure that the surface of them is clean.
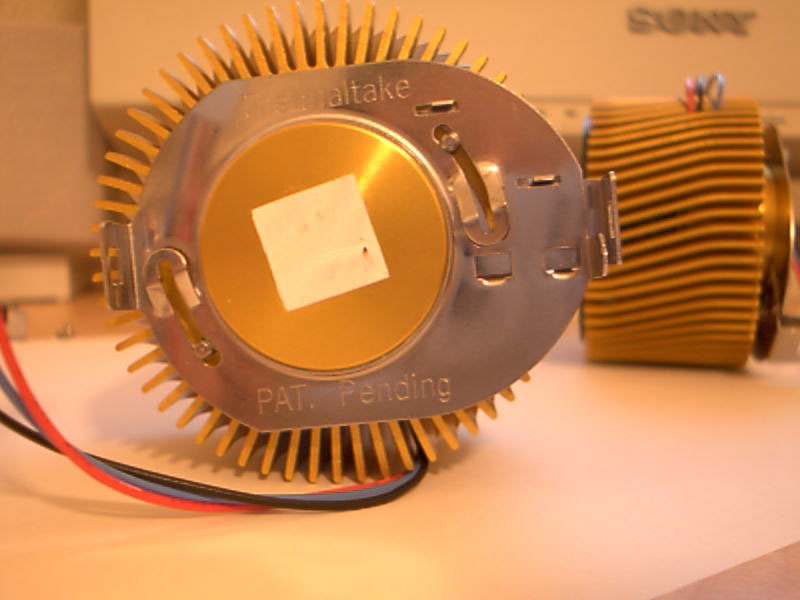
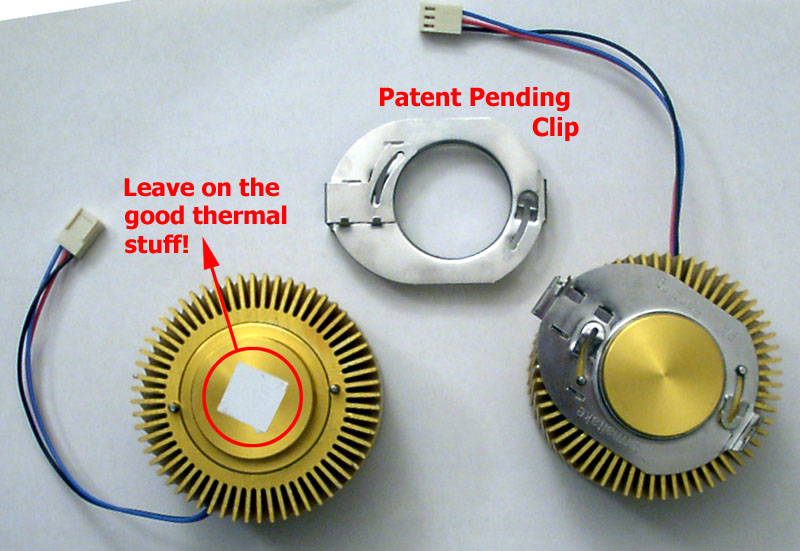
 Step 2: Gently pry loose the Patented Chrome retaining clips form the bttom of the orbs.
While making sure not to destroy the square pad of heatsink compound. Step 2: Gently pry loose the Patented Chrome retaining clips form the bttom of the orbs.
While making sure not to destroy the square pad of heatsink compound.
According to Davo at Hothardware, (Check out his Orb review) that stuff is Top Grade Heat Ttransfer Compound. I made the mistake of smudging it
few times so I wiped off the stuff and bought a cheap replacement at radio shack.
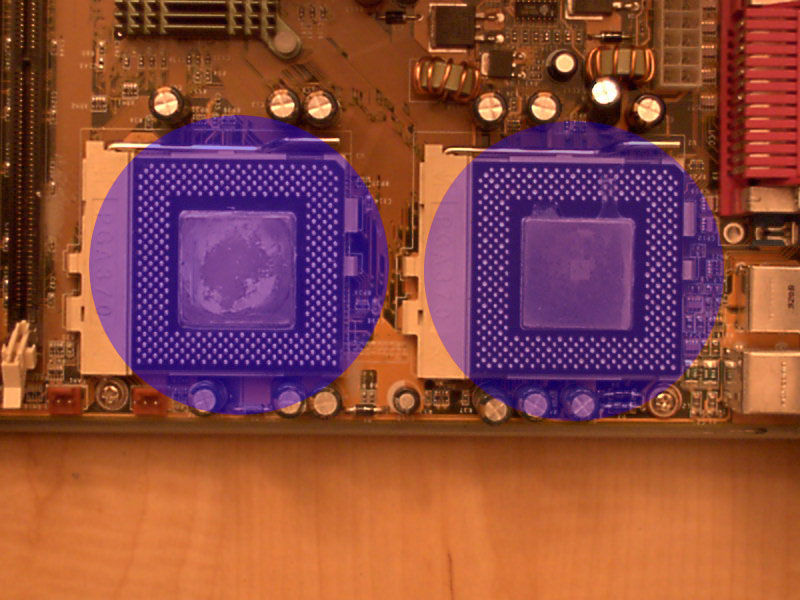
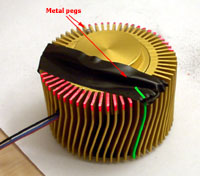 Step
3: You will now need to mark off the fins on the Step
3: You will now need to mark off the fins on the 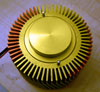 Goden Orbs. The picture below shows
which fins need to be filed down. (This is where the red marker gets used). Goden Orbs. The picture below shows
which fins need to be filed down. (This is where the red marker gets used).
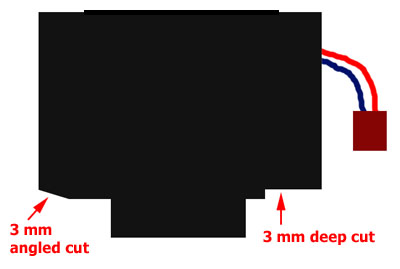
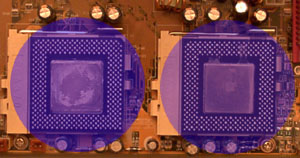 If
you look at the picture you can see how fforgetar the Golden Orbs overlap onto the capacitors of the motherboard.
There is a about a 3 mm height clearance problem here. Use the electrical tape to mark off parts of the heatsink
that you don't want to get scratched. If
you look at the picture you can see how fforgetar the Golden Orbs overlap onto the capacitors of the motherboard.
There is a about a 3 mm height clearance problem here. Use the electrical tape to mark off parts of the heatsink
that you don't want to get scratched.
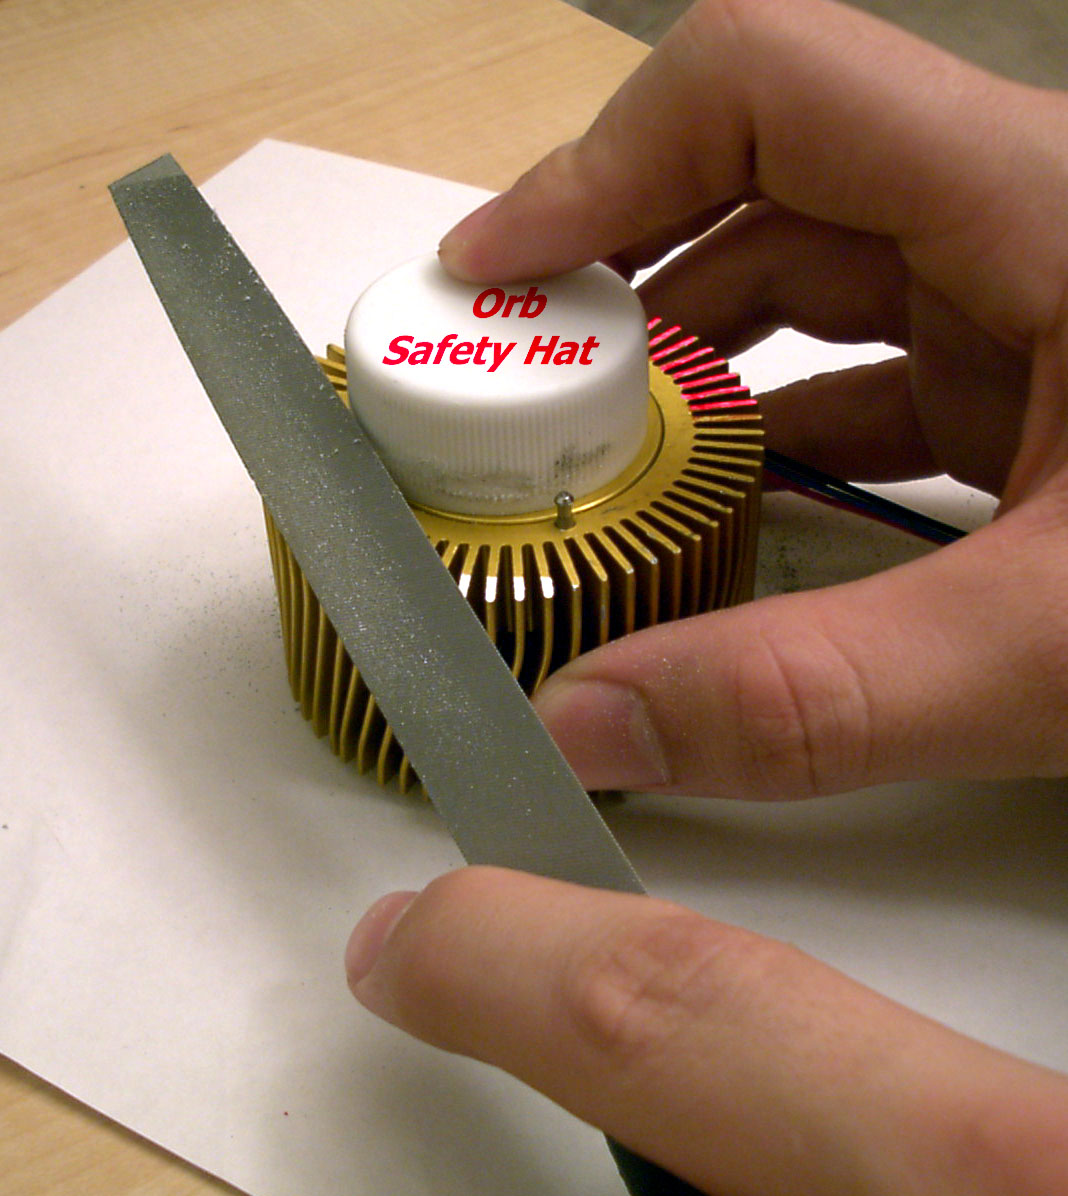
Step 4: Hopefully by now you have figured out what the 3 litre bottle of Mountain Dew is all about. Take
off the cap (you will be using it now) and place the heatsinks upside down and golden side up (exposing the thermal
pad and the bottom of the orbs). Place the plastic cap onto the bottom slug of the heatsink. You may now want to
take a swig of the Mountain Dew and then place the bottle in a safe place until further use.
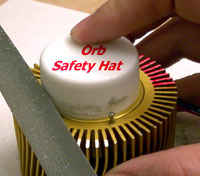 Step
5: Take out the metal file and begin filing down the red marks on the fins. Yes, the plastic cap does come
in handy as a protective helmet for the Golden Orb. The side of the heatsink opposite of the power cable only needs
a slight amount of metal filed off. A quick rounding off of the edges of the fins does a nice job. Step
5: Take out the metal file and begin filing down the red marks on the fins. Yes, the plastic cap does come
in handy as a protective helmet for the Golden Orb. The side of the heatsink opposite of the power cable only needs
a slight amount of metal filed off. A quick rounding off of the edges of the fins does a nice job.
TIP: Don't re-use the protective Golden Orb Safety hat on your half empty bottle of Mountain Dew.
 Step
6: You will need to make sure you file down an indention about 3 mm deep to clear the Step
6: You will need to make sure you file down an indention about 3 mm deep to clear the  capacitors. For those
of you that are the "Tim Allen" type, use a dremel tool or another type of power tool. capacitors. For those
of you that are the "Tim Allen" type, use a dremel tool or another type of power tool.
TIP: Clean the area under the heatsink while you are working, otherwise the aluminum shavings will scratch
the plastic and golden skin of the heatsinks. at which point you would have "Just Orbs" -minus the golden
part. I had a trash can nearby to dump the shavings into every few minutes.
Step 7: Repeat steps 2-7 for the second orb. Except use the same protective helmet from orb number 1.
Don't forget to "Do the DEW!" again, cuz filing down that heatsink tough.
Step 8: (you might need saftey goggles for this part) Take the orbs and the can of air and blow away
any remaining aluminum debris stuck to the fins and fans. That stuff can short circuit your mobo and other peripherals
if it gets inside your case.
TIP: Walk outside and spay these things off, that dust can make a really big mess. Although a little
aluminum in you diet can't hurt, a lot would be hazardous.
 Step
9: Place the clips back on. Make sure you put them back in the right direction. they were a pain to take off,
so double check the re-assembly. Now check your thermal pads for damage. If you were clumsy like me, then you probaly
ended up having to wipe off that stuff. At which case you will need to open up that tube of heatsink compound and
apply a small amount to the bottom of the orbs. Step
9: Place the clips back on. Make sure you put them back in the right direction. they were a pain to take off,
so double check the re-assembly. Now check your thermal pads for damage. If you were clumsy like me, then you probaly
ended up having to wipe off that stuff. At which case you will need to open up that tube of heatsink compound and
apply a small amount to the bottom of the orbs.
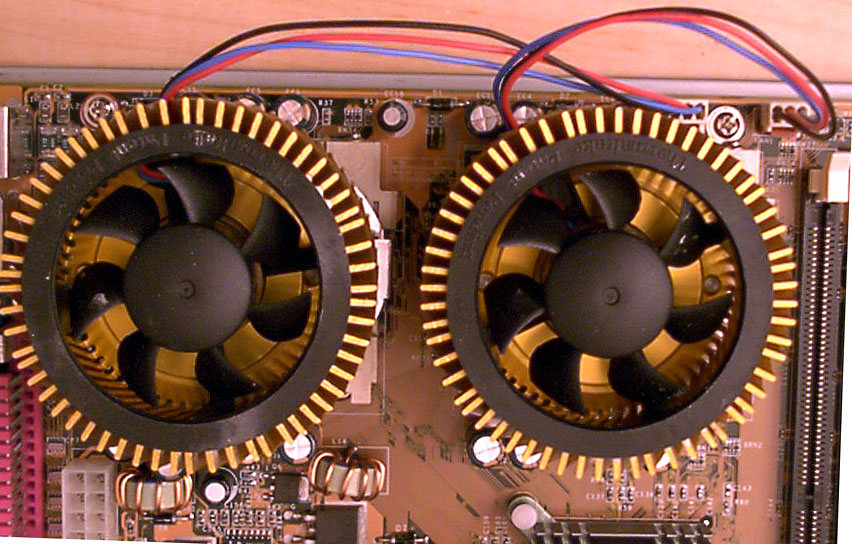
Step 10: Place the modified Golden Orbs back onto the CPU's. To secure them down, give your Orbs a counter-clockwise
twist until you can feel them tighten (click). I'm not exactly sure if they made click sound, but you should be
able to tell when they are tight. If they make a loud "cracking" noise, then you twisted a little too
far and need to stop taking too many vitamins. Now attach the short power leads to the 2 fan connectors on the
motherboard. If the power lead is way to short, then you messed up on Step 9 and didn't pay attention -drink
more Dew and try again.
 That's
all there is to it. If all worked out right then you should hear the cool humming sounds coming from the orbs when
they power up. If so, then pat yourself on the back then get ready for some Dual Golden Orb Action! (But first, make sure to go to the restroom
and get rid of the 3 litre's of Mountain Dew - You don't want to wet yourself do u?) That's
all there is to it. If all worked out right then you should hear the cool humming sounds coming from the orbs when
they power up. If so, then pat yourself on the back then get ready for some Dual Golden Orb Action! (But first, make sure to go to the restroom
and get rid of the 3 litre's of Mountain Dew - You don't want to wet yourself do u?)
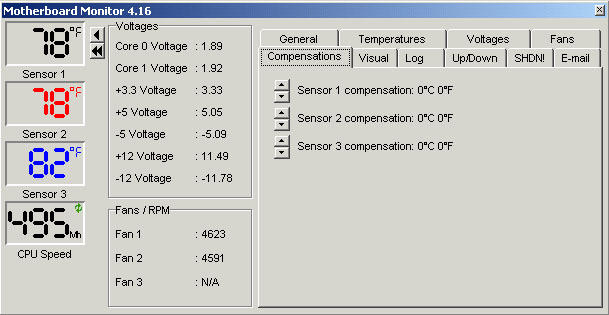
PERFORMANCE: The first day I couldn't find my tube of thermal Heatsink compound,
so I ran the Golden Orbs dry (i.e not thermal paste). My average temperature ended up being about 100°F-105°F.
Which was not too bad for my overclocked 300A's @ 450 MHz (2.1V).

NOTE: The next day after digging through boxes I found my paste. and applied them to my Orbs (Golden
Orbs that is). I noticed a big jump in cooling efficiency. I now get 80°F-85°F at normal CPU usage and
87°F-96. Running RC5 I get about 95-104°F. Since then I have added 2 case fans to blow cooler air toward
the orbs, and noticed a 5-10° difference.
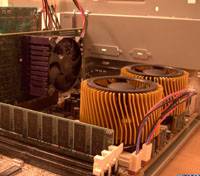
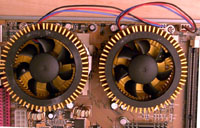
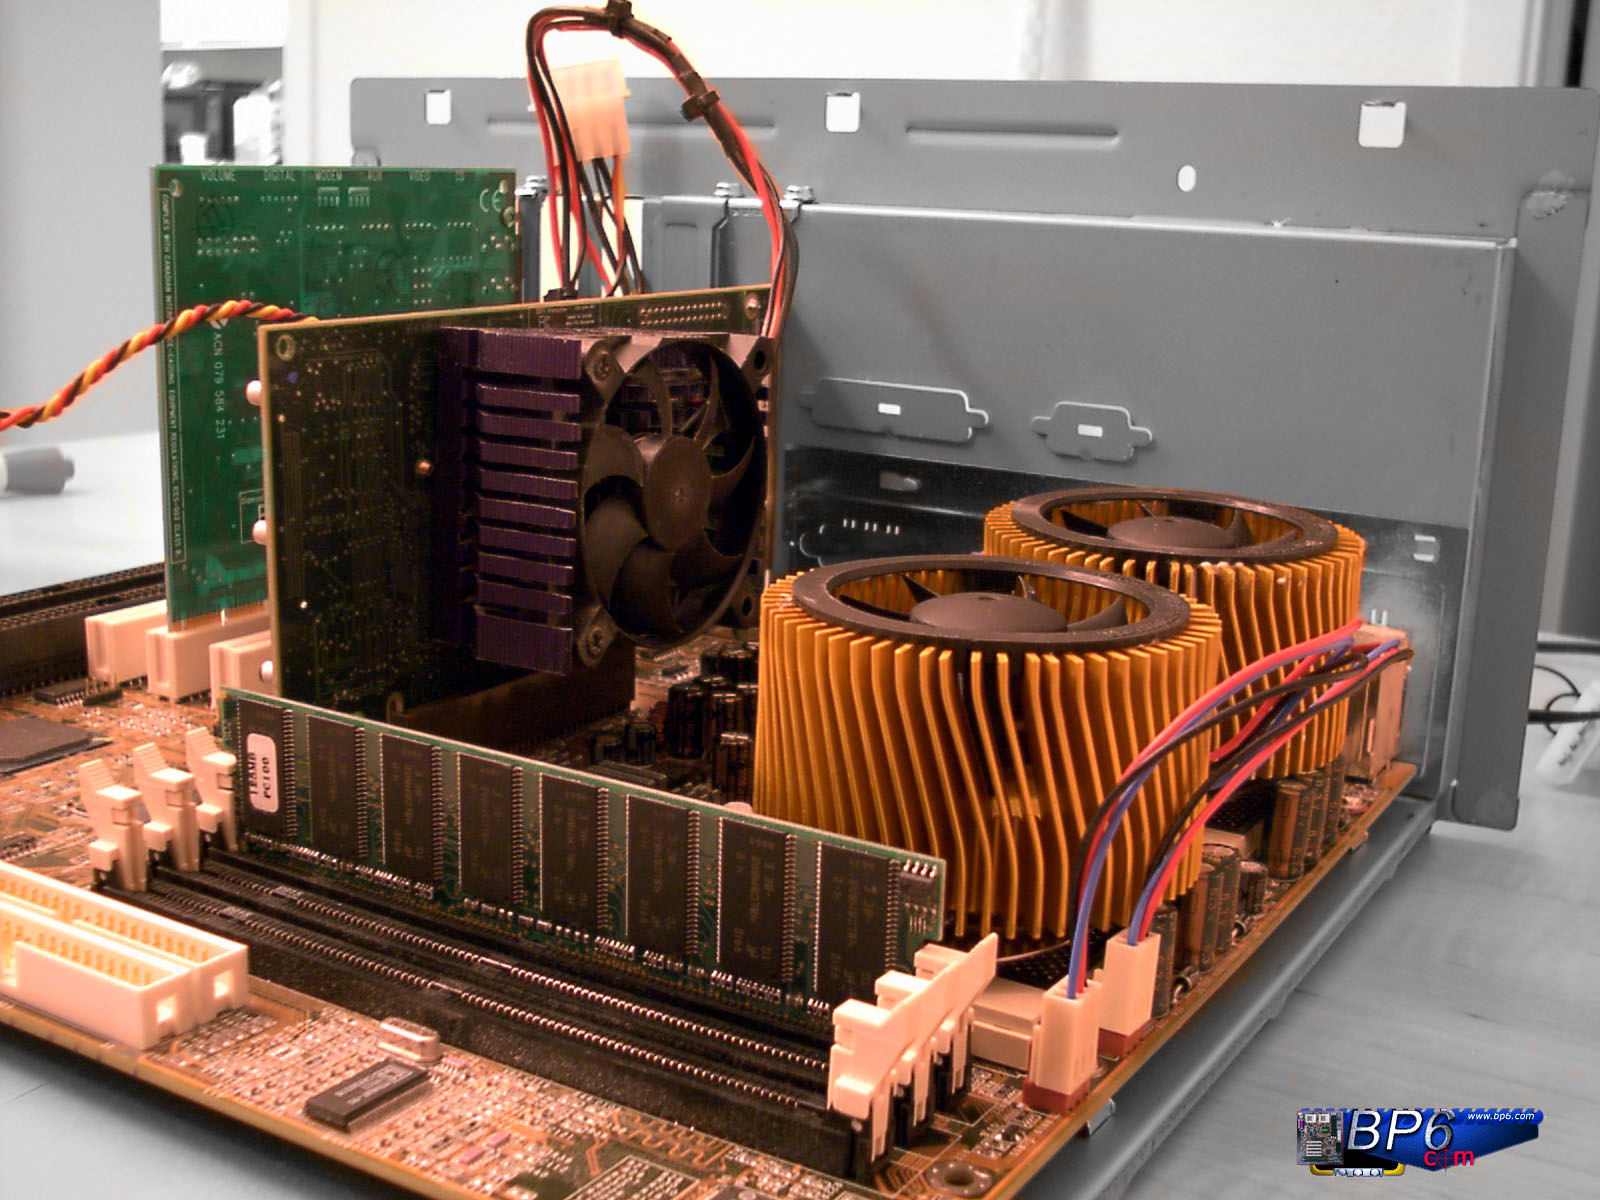
(The picture to the right is of the system at idle after the addition of 2 case fans blowing on the orbs.)
 Conclusion: These orbs are way cool. (pun intended and meant to be taken both ways.). Big thanks
go out to Tony over at Plycon.com for sending these to the BP6.com testing
lab (tell them tim@BP6.com sent you. These things offer performance that easily matches the other well known overclocking
heatsinks out there. I haven't had a chance to test any Alpha's or newer Globalwins yet, but my first impression
of the Golden Orb is good. Conclusion: These orbs are way cool. (pun intended and meant to be taken both ways.). Big thanks
go out to Tony over at Plycon.com for sending these to the BP6.com testing
lab (tell them tim@BP6.com sent you. These things offer performance that easily matches the other well known overclocking
heatsinks out there. I haven't had a chance to test any Alpha's or newer Globalwins yet, but my first impression
of the Golden Orb is good.
Before using the Golden orbs, I was only able to run my 300A's @ 450 MHz (both cpu's using 2.1V). Then
again I was using a wimpy oem and retail heatsink.
Now: I have My CPU's running at 494 MHz (110 MHz FSB & both CPU's at 1.85 V). That's a big jump!
I'm not saying that these golden thingies will let you reach 1 gigahertz per proccesor, just by poping them on
your CPU's, I'm just reporting what my current setup is running at and my results. I never really had HS/fans that
would let my system run stable enough to try them at that speed.
PROS: Good looks, good cooling performance, good price, cool sound (a cool turbine-like sound - calming
humming noise), patented Inovative retension clip.
CONS: Short power lead (not a problem on the BP6 mobo), Heatsink must be modified to fit properly on
the BP6.
>>Click here
for the Golden Orb Background Image<<
(1600X1200 resolution)
FWant more
pictures?Click here
|


